
We’ve included an overview of the type of chainsaw you’ll need at the bottom. Please always consult your chainsaw manual for further detailed information.
Chainsaw safety
Small but mighty, our Power+ chainsaws are equipped with robust safety and other thoughtful features. They offer professional grade cordless technology to every gardener.
While our Power+ chainsaws have all the safety features of professional models, using them still holds risks. Always consult your manual carefully and follow the safety advice. This includes:
- Always be sure of your footing.
- Hold the chainsaw firmly with both hands while the motor is running.
- When the saw chain is stopped due to pinching during cutting, release the trigger switch; remove the saw chain and guide bar from the wood, then restart.
- Do not pull the saw chain with your hand when it is bound by sawdust. Serious injury could result if the chainsaw starts accidentally. Press the saw chain against the wood, move the chainsaw back and forth to discharge the debris.
- Always remove the battery pack before cleaning.
- Wear heavy protective gloves when handling the saw chain.
- Never start the chainsaw when it is in contact with the wood and always allow it to reach full speed before applying the saw to the wood.
- Always consult your manual before using your chainsaw for the first time and remain familiar with its contents.
- If ever unsure with felling of trees, please consult a professional arborist (tree surgeon).
Basic chainsaw techniques
Terminology
- Felling - cutting a standing tree
- Bucking - cutting the tree into usable lengths
- Overbuck - cutting a fully-supported trunk/branch
- Underbuck - initial cut into wood supported at one end
- Limbing - removing branches from a fallen tree
- Notching undercut - a preliminary cut to prevent ‘pinching’
- Felling back cut - the main felling cut
1. Felling a tree
Caution!
- When bucking and felling operations are being performed by two or more people at the same time, separate the felling operation from the bucking operation by a distance of at least twice the height of the tree being felled.
- Beware of other people, animals, vehicles, utility lines, buildings and other property close by.
- If the tree makes contact with any utility line, you must notify the utility company immediately.
- When operating the chainsaw, stand on the uphill side of the terrain, as the tree is likely to roll or slide downhill after it is felled.
- Plan and clear an escape path before cuts are started. The escape path should extend back and diagonally to the rear of the expected line of fall.
Process
- Before felling is started, consider the natural lean of the tree, the location of larger branches and the wind direction to judge which way the tree will fall.
- Remove dirt, stones, loose bark, nails, staples and wire from the tree.
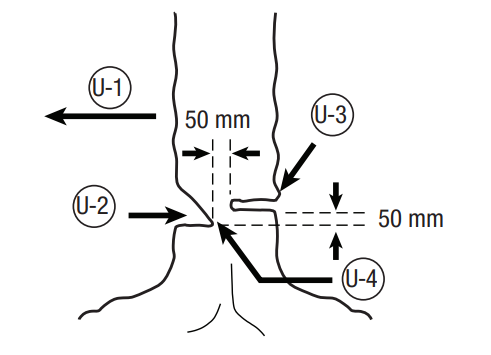
- Make a horizontal notching undercut. The notch will be 1/3 the diameter of the tree, perpendicular (at right angles to) to the direction of falls. Making it first helps avoid pinching either the saw chain or the guide bar when the felling back cut is being made.
- Make the felling back cut. This should be at least 50mm higher than the horizontal notching cut (above) and parallel to it. Leave enough wood to act as a hinge, which will keep the tree from twisting and falling in the wrong direction: don’t cut through the hinge.
- As the felling gets close to the hinge, the tree should begin to fall. If there’s any chance that the tree may not fall in desired direction, or that it may rock back and bind the saw chain, stop cutting before the felling back cut is complete and use wedges of wood, plastic or aluminium to open the cut and drop the tree along the desired line of fall.
- When the tree begins to fall, remove the chainsaw from the cut, stop the motor, put the chain saw down, then use the retreat path planned. Be alert for overhead limbs falling and watch your footing.
2. Limbing a tree
Process
- Leave larger lower limbs to support the log off the ground.
- Remove the small limbs in one cut.
- Branches under tension should be cut from the bottom in an upwards direction to avoid binding the chainsaw.
3. Bucking a log
Caution!
- Make sure your footing is firm and your weight is evenly distributed on both feet.
- When possible, the log should be raised and supported by the use of limbs, logs or chocks.
- When bucking on a slope always stand on the uphill side of the log.
Process
- When the log is supported along its entire length you cut it from the top. This is known as an overbuck.
- When the log is supported at an angle (on one end), cut 1/3 the diameter from the underside. This is known as an underbuck. Finish by overbucking to meet the first cut.
- When the log is supported on both ends (not whole length), cut 1/3 the diameter from the top (overbuck). Then make the finished cut by underbucking the lower 2/3 to meet the first cut.
- To retain complete control when ‘cutting through’, release the cutting pressure near the end of the cut without relaxing your grip on the chain saw handles. Don’t let the chain contact the ground.
- After completing the cut, wait for the saw chain to stop before you move it.
- Always stop the motor before moving from tree to tree.
Power+ chainsaws
Our smaller chainsaws are suitable for casual gardeners. They are sized between 35cm and 40cm, more than capable of tackling trees in the average garden or allotment (see the EGO Power+ cordless chain saw range).
If you’re a professional user like landscape gardeners or arborists requiring heavy duty battery powered chainsaws, we’ve created the Professional and Professional-X ranges.