Having a lush green lawn in time for summer is one of life’s simple pleasures. For some of us though, we look outside and notice bare and unsightly patches and wonder if there’s anything that can be done to fix it.
Luckily, reseeding is the answer, and the best thing is that you don’t have to reseed your entire lawn if it doesn’t need it. You can carry out reseeding only on the areas that need a bit of lawn renovation.
Before you consider reseeding
Reseeding is quite a drastic practice, so before you take the steps to reseed your lawn, try some techniques to encourage a healthy lawn first:
- Remove weeds
- Regularly remove thatch (the layer of dead organic matter that accumulates on the turf)
- Feeding with either organic matter like manure or compost
- Regularly remove moss
If you still don’t see an improvement in your lawn after trying these out, you can try reseeding.
Getting the timing right
The best time to reseed your lawn is spring or late autumn when the ground temperatures average between 7-8°C. It’s not just the temperatures, though, that make it the ideal time:
- Frost is far less likely, which can damage or even kill seedlings.
- The days are long enough to provide enough sunlight for seeds to germinate and take root.
- If sowing in the autumn, there’s still enough time for the grass to grow to the point where it can survive the cold of winter.
- During dry periods, there is a chance of dew rather than frost, which can provide enough moisture for the seeds to sprout.
- As a bit of mowing is required when reseeding, the days of autumn and spring are still long enough to dry the grass out completely so it won’t clog up your cordless lawn mower when mowing.
In the spring or autumn, the soil is likely to be in the best condition (not too wet or too dry). When it’s too wet, it will make working difficult by soil sticking and clogging up your equipment. You also run the risk of your seeds rotting in the ground after you’ve sown them.
On the other hand, soil that is too dry lacks sufficient moisture to germinate your seeds. It can also be labour-intensive to break through hard, dry soil with a garden fork.
What about summer or winter?
In early summer, the temperatures can increase rapidly, and so you run the risk of sowing your seeds when it’s too hot (30°C and above) and possibly not enough water. Likewise, in early winter, temperatures can plummet, and early frost can mean it's too cold (less than 7°C), and your seeds will fail to germinate.
How to prepare your lawn for reseeding
Gather your tools
Before you start, you will need to prepare for reseeding. The tools and materials you will need are:
- A rake
- A garden fork or a cultivator like the EGO CTA 9500 attachment (if you are using the EGO cultivator, you will also need the Multi-Tool power head it attaches to)
- Compost - either your own or store-bought
- Grass seed
Identify the areas for reseeding
The areas for reseeding will look thin, worn out, and sparse - there may even be brown patches of soil showing and no growth. These areas might not necessarily be large; you may only need to reseed a small section of your lawn.
Remove any weeds growing
You may notice weeds like docs and Redshank growing in your reseeding areas. Now is the best time to remove them before they take hold and compete with your seeds.
Mow the area
If grass is growing around the edges of the area you’re reseeding, you don’t want it to become too long and restrict sunlight from your newly sown grass seed. Before you start reseeding, mow the area first to prevent this. If it's a small area, you could use a cordless line trimmer instead.
How to reseed your lawn
Now you have prepared your lawn, follow the below steps for a flourishing, healthy lawn in time for summer.
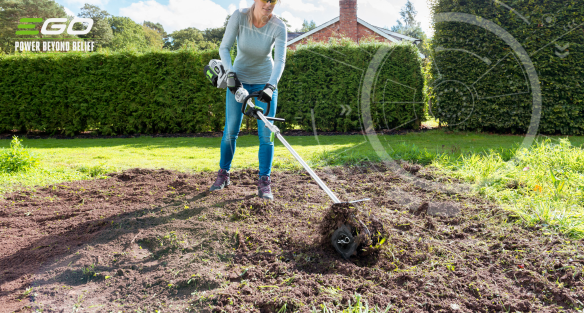
1. Turn over the turf
Using a garden fork or cultivator, expose the soil by turning over the turf. This gives the grass seeds a good base and allows them to take root easily. It also means you will suppress any weeds that you have missed, allowing your grass to get ahead before they re-root.
2. Apply compost and rake the area level
Once you have turned over the soil, apply compost and rake the area level. You can afford to add the compost liberally here, so add as much as you like!
As you rake the area level, you’ll naturally rake in the compost. After you’ve finished raking, remove any stones, rocks, or other debris lying on the surface.
3. Scatter your grass seed
Now, you are ready to scatter the grass seed over the area. You should sow the seed at the rate recommended by the supplier; however, if in doubt, more is better than less here. Just make sure you cover the entire area with seed.
To avoid running out, we recommend sowing per the recommended rate and then applying a little extra if you have any leftovers.
4. Lightly compact the reseeded area
Just like you do when sowing seeds in a pot, compact the seeds by treading over your soon-to-be lawn. There’s no need to stomp the seeds here; all you need to do is make sure the seeds are pressed into the ground.
5. Water the seeds in
All that’s left to do now is water the seeds with a watering can or hose pipe. Without moisture, you risk the seeds failing to germinate, and all your hard work will be undone. Or, if you know rain is on the way, you can let nature do it for you.
What if my seeds haven’t germinated?
You should start to see some new growth 7-10 days after reseeding. Before you take the steps to remedy this, you should consider the recent weather you’ve been having. Conditions like dry weather and cooler temperatures (less than 7°C) mean there may be a delay in germination. In this event, wait a little longer before you check the viability of your seeds.
If all seems to be well weather-wise, and you have followed our guidance above, then the issue is likely with your seeds not being viable, which is caused by the following:
- Improper storage, like not storing your grass seed in a cool, dry place since purchase and/or
- Seeds being out-of-date
How to check the viability of your seeds
Checking the validity of your seeds is easy but requires some patience. Here’s what you need to do:
- Get a damp paper towel and sprinkle some of your seed onto it
- Either fold the towel over, making sure not to spill the seeds
- Leave at a temperature of no more than 25°C
- Keep the towel moist and check it regularly
- In 7-10 days, you should see the seeds starting to sprout
If you carry out the above steps and still can’t see any signs of germination, you know your seeds are ineffective. In this event, purchase some new seed, re-rake the area you’re re-seeding, and repeat steps 3-5 above.
The benefits of using a cultivator to prepare your lawn
Aside from making the labour-intensive task of turning over soil and turf much easier, using a cultivator like the EGO CTA9500 battery Cultivator brings you many more benefits in the garden:
- Weeds are easier to remove and control
- Drainage is improved as the tool helps to break up compacted earth
- Benefits to overall plant health by helping to aerate the soil
- Mixes the soil with applied fertiliser or compost quickly and effectively
Make work even lighter with the EGO CTA9500 Cultivator
Powered by EGO’s ARC Lithium™ 56v battery technology, combined with a two-speed button on the Multi-Tool power head and a 21.5cm tilling depth, the EGO CTA9500 can tackle a variety of garden soils.
The tool is easy and lightweight to operate too. Simply attach the cultivator to the Multi-Tool power head, attach the EGO removable battery and off you go. Coming with an exceptional warranty of 5 years for domestic use and 2 years for professional use, we have you covered for any faults or malfunctions.